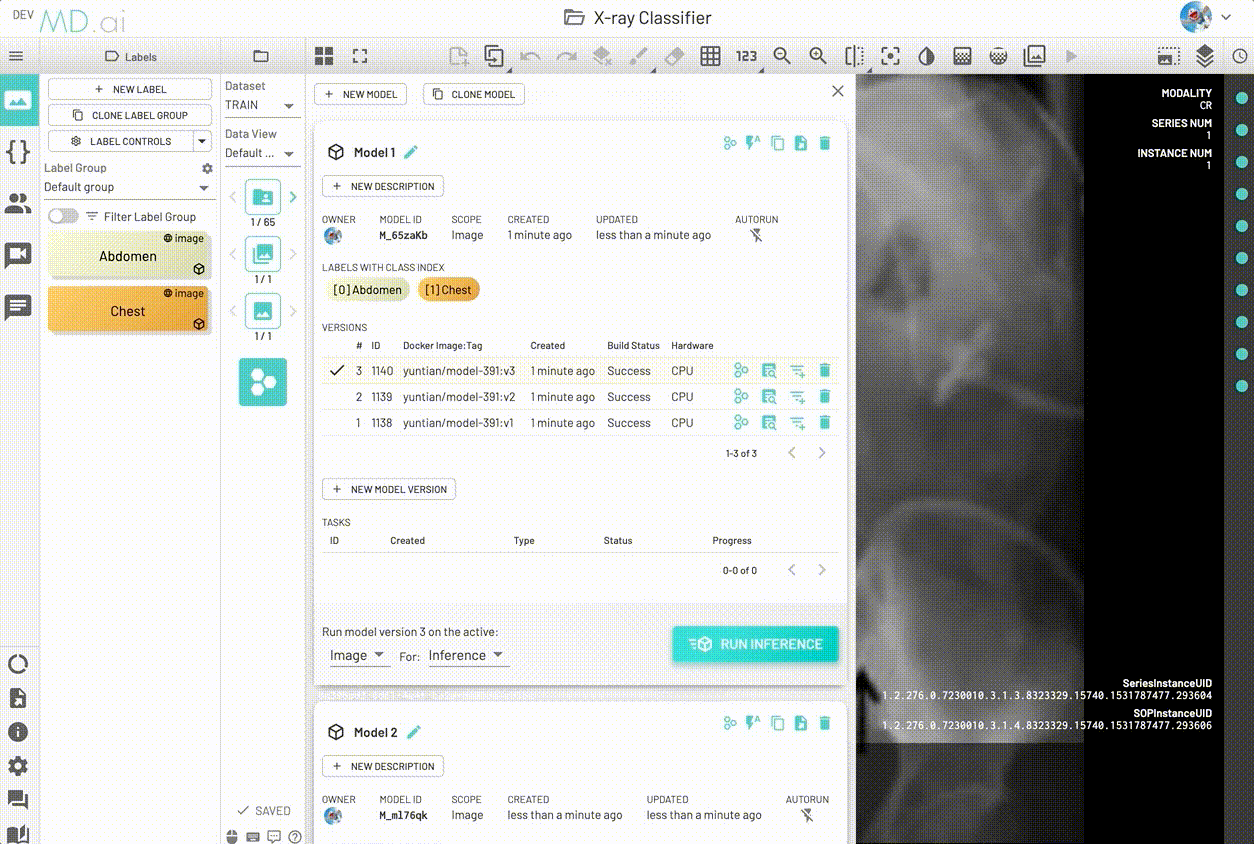
Model Settings
When you create a new model on MD.ai, there are a bunch of settings that you can choose from in order to make your model more visible and accessible across our platform. These settings can also be changed later on from the model card once the model has been deployed successfully.
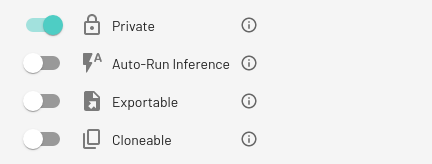
Private
Controls the model visibility. Private models are visible only to the model owner and project users. Public models are visible to all users.
Note
Models within public projects must all be public.
Auto-Run Inference
If model auto-run inference is enabled, then the model will automatically run an inference task on newly added data to the project. No need to press any buttons or select any images, the outputs will be generated automatically as soon as new data is available in the project.
Exportable
If the exportable setting is enabled, then the model code/zip file can be exported by user authorised to view the model in the project. By default, only the model owner is authorised to export models. The schema for exported models can be found here.
Project admins and model owners can also Disable Models Export by going to the project settings tab. This will make all models in the project non exportable no matter what the individual model's exportable setting is.
You can export models using two ways -
Export through Model Card
To export model from model card, perform the following steps -
- Click
Export Modelbutton at model title bar. - Select versions to export. Multiple versions can be exported together.
- Click
Exportbutton to generate export file and wait for it. - Click
Download Filebutton to download model file.
Export through Side Export Panel
To export model from side export panel, perform the following steps -
- Click show export button to popout side export panel.
- Select model to export (can only export self-created model)
- Select model versions to export (can select "ALL", "NO" or multiple versions)
- Click
Exportbutton to generate export file - Click
Download Filebutton to download model file

Run exported models locally
Note
Running exported models on your local machine will only work with mdai>=0.12.0.
In order to run the exported model version locally it is required that you have anaconda installed on your system. The following steps need to be followed once you've exported the required model from MD.ai -
- Extract the exported
.zipfile to the desired folder. - Install the
mdaipython library, if not already installed. (Instructions) - Import the
mdailibrary in python and use themdai.run_inference(model_path, data_path, model_version)method for generating outputs locally.
This will generate a .csv file for the model predicitons and save it in the same folder as defined in the model_path argument.
The arguments for the mdai.run_inference() need to be specificed correctly -
- model_path: Path to the
modelfolder in the extracted model's.zipfile. (eg./home/johndoe/lung_model/model) - data_path: Path to the input DICOM files.
- model_version: Version of the downloaded model to run. Default
v1
The command will create an isolated conda environment that installs the necessary requirements for the model and runs it without any dependency conflicts.
In order to delete the conda environments created by previous runs of the model you can use the mdai.delete_env(model_path) method, where model_path is defined above.
Cloneable
If the cloneable setting is enabled, the model can be cloned by authorised users who have access to the model in the project. You can choose the model to be cloneable either Site only, which will only allow cloning of the model with the same MD.ai site, or Across MD.ai which will allow cloning of the model across all MD.ai sites. This setting cannot be changed once the model has any versions cloned from another model.
Models can be cloned by a two step process -
1. Create a Model Clone ID
If a model is cloneable, project users can see a Create Model Clone Code button on the model card title bar. To create model clone code, perform the following steps:
- Click
Create Model Clone Codebutton on top of the model card title bar. - Select the version you wish to clone. Multiple versions can be selected.
- Click
CREATE CODEbutton to generate a clone code. - Copy this code
If model is Public and Cloneable, users can create a clone code through the hub's Public Models section. The way to create clone code is the same as it is in model card.
2. Clone Model with the Clone ID
With a clone ID copied, user can clone the model into any project of their choice. To clone model, perform the following steps:
- Open
Modelspanel. - Click
CLONE MODELbutton. - Paste the copied model clone ID.
- Click
CLONEbutton.
Your cloned model will be ready for use.
We also support cloning, updating and deleting models using our CLI tool. You can have a look at the instructions here.