
Viewing Images
Window, zoom, compare series, measure, and tune image display
The viewer tools are in the toolbar above the images. Hover over any button to see its name and shortcut. When the window is narrow, related buttons collapse into a single icon. See Keyboard Shortcuts for the full list of shortcuts.
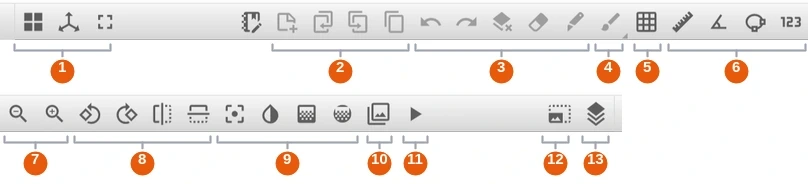
- Viewer layout, MPR and fullscreen
- Note and copy tools for the active annotation
- Undo, redo, clear, erase and chop/extend
- Mask tools
- Grid
- Ruler, angle, elliptical ROI and pixel probe
- Zoom
- Rotate and flip
- Reset, invert, window/level and ROI window/level
- Image filters
- Cine
- Image render settings
- Layers Control
The unnumbered button before group 2 launches MD.ai Reporting, and appears only on deployments with reporting enabled.
Mouse controls
When no annotation is active, the mouse controls the view:
| Action | Mouse |
|---|---|
| Scroll through images | Scroll wheel, or hold ← / → |
| Adjust window/level | Left-drag |
| Zoom | Right-drag |
| Pan | Middle-drag, or Ctrl/⌘ + left- or right-drag |
| Point to the same location in all viewers | Ctrl/⌘+Shift + left-drag |
While an annotation is active, the left button draws and edits it instead. Click Inactivate on the annotation, or press Alt+W, to return to viewing.
Window and level
- Drag with the left button: horizontally for width, vertically for level.
- Window/Level: set exact
Window WidthandWindow Centervalues, or choose a preset for the image's modality. - CT presets: press
Alt+1toAlt+9for Brain, Subdural, Stroke 1, Stroke 2, Temporal Bone, Abdomen/Pelvis, Bone, Mediastinum and Lung.Alt+0resets to the default. - ROI Window/Level (
Alt+O): select an area of interest to optimize the window for it. - Invert Colors (
Alt+I).
Admins can set a default window for the whole project.

Zoom, rotate and reset
Zoom In/Zoom Out(Ctrl/⌘++/-), or right-drag.Rotate 90° Counterclockwise,Rotate 90° Clockwise,Flip HorizontalandFlip Verticalapply to every image in the series.
Reset the view
Center and Reset Viewport (Alt+R) undoes zoom, pan, rotation, flips, inversion and window/level changes.
Compare series
Viewer layout
Click Viewers Settings and choose a layout of up to 2 rows by 3 columns. Click a viewer to make it active; the toolbar and labels act on the active viewer. With several viewers open, the Navigation column shows a map of them.

To open the same series layout for every exam automatically, admins can set up hanging protocols.
Synchronize viewers
Under Viewers Sync, select the viewers to link and click Confirm. Synced viewers scroll together, matching slices by their position in the patient.

Once viewers are synced, two more options appear:
- Lock-step scrolling: scroll by the same number of images instead of by position. Use it for series without position information, or to compare different exams image by image.
- Sync windowing: apply window/level changes in the active viewer to all synced viewers.
Reference lines and 3D cursor
With series in different planes, the other viewers show where the active image cuts through them. Ctrl/⌘+Shift + left-drag points to the same location in every viewer. Turn these on or off in Layers Control with DICOM Cross-Reference Lines and DICOM Location Synchronization.


For 3D reconstructions of a single series, see MPR.
Measure
Measurement tools are available when no annotation is active. Measurements aren't annotations: they don't use a label and aren't exported. To record a measurement as data, annotate with a line or ellipse label instead.
| Tool | Measures |
|---|---|
Add Ruler | Distance, in mm when the image has pixel spacing |
Add Angle | Angle in degrees |
Add Elliptical ROI Tool | Major and minor axes, circumference, area, mean and standard deviation (in HU on CT), and rotation. Click the copy icon to copy the values. |
Pixel Probe | The value of a single pixel |
Show Grid (Ctrl/⌘+\) overlays a square or hexagonal grid. Choose the Grid Type and Grid Size in Grid Settings.
Image filters
Image Filters applies Sharpen, Blur, Emboss, Edges (Sobel) or Histogram Equalization. Histogram equalization (CLAHE or AHE) brings out subtle contrast; adjust the tiles and clip limit to tune it.

For example, histogram equalization makes a subtle nodule in the right mid lung easier to see:


Cine
Cine Play (Space) plays the series as a movie. In Cine Settings, choose the direction and frames per second, or reset to the default rate (Reset to native FPS for videos).
Layers Control
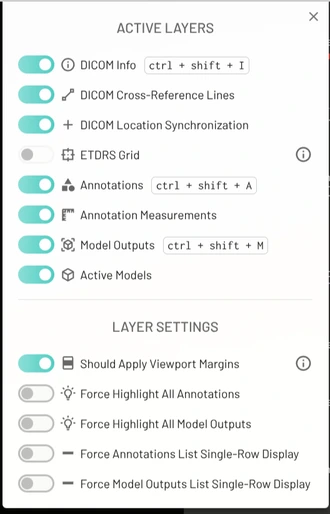
Layers Control shows or hides what's drawn over the images:
| Layer | Shows |
|---|---|
DICOM Info | Patient, exam and image information in the corners (Ctrl/⌘+Shift+I) |
DICOM Cross-Reference Lines | Reference lines between viewers |
DICOM Location Synchronization | The shared 3D cursor |
ETDRS Grid | The ETDRS grid, on OCT exams |
Annotations | Annotations (Ctrl/⌘+Shift+A) |
Annotation Measurements | Lengths and areas on annotations |
Model Outputs | Model outputs (Ctrl/⌘+Shift+M) |
Active Models | Models currently running on the image |
Under Layer Settings, you can also highlight all annotations or model outputs at once, show the annotation and model output lists in a single row, and add margins around the image.
Fullscreen
Toggle Fullscreen (Ctrl/⌘+Shift+F) gives the images the whole screen. Press Esc to exit. To make more room without fullscreen, click a column header (Project, Labels, Navigation, Recent Events) to collapse it.

Faster scrolling on large series
Image Render Settings controls how images are loaded:
Use Rendered Image(on by default) loads images rendered on the server.Scrolling Image Resolutionsets the resolution while you scroll. The default,Max, always shows full resolution. Lower it, down toMin, to scroll large CT and MR series faster; full resolution loads when you stop.
Low-resolution scrolling needs Use Rendered Image on. Turning it off decodes images in your browser at full resolution, which some image formats require.